Table of contents
Intro
Disclaimer: all these services are paid (they might have some free versions).
In the past, I’ve used all sorts of combinations when it came to WordPress optimization plugins:
- WP Fastest Cache with Autoptimize and reSmush.it
- W3 Total Cache with reSmush.it
- LiteSpeed Cache
- WP Rocket Cache and reSmush.it or
And while it was fun to tweak and adjust them based on my needs, it got tiring at some point.
When you have multiple clients who need ongoing maintenance, you want a setup that shares common elements across websites. It makes it easier to troubleshoot issues, apply updates, maintain consistency, and quickly implement it for new clients.
Some of the solutions mentioned above still have their place. For example, W3 Total Cache works great with an ElasticCache server, allowing the same cache to be shared across multiple servers hosting the same WordPress instance. LiteSpeed Cache is ideal if you’re running a LiteSpeed server. However, these setups are niche-specific and limited in scope.
WP Rocket Cache
WP Rocket doesn’t need any introduction.
It’s a well known WordPress plugin that has been tested and used for so many years in the WordPress community. It has great tracking record when it comes to reviews and support.
What I appreciate most is its simplicity: it makes it easy to enable performance features without diving deep into a complex list of options. Advanced configurations are handled behind the scenes.
I purchased the 50-site license, which fits our current needs. One helpful detail is that subdomains under a domain are covered by the same license, so you won’t need an extra license for your staging or development environments.
Imagify
Imagify comes from the same family of products as WP Rocket, which made the decision even easier.
I opted for the Infinite plan, so I don’t need to worry about file limits or media size.
I can slap it on any of the WordPress sites that I’m working on, run the whole media library through Imagify, and be done with it.
You can also use the web interface to optimize images not hosted on your WordPress site, or leverage their API to integrate with other projects.
No complaints so far, it follows the same philosophy as WP Rocket: install, activate, and it works. You can tweak the settings, but 90% of the time you won’t have to. I’ve left mine with the default configuration.
Bunny CDN
While working on my personal website earlier this year, I discovered Bunny CDN.
I wanted a CDN and storage solution that wasn’t based in the U.S., something outside the realm of the big cloud providers. This was around the time Trump-era tariffs sparked conversations about EU-based alternatives.
Bunny offers more than just CDN services—they also provide storage, edge scripts, DNS, performance optimization, and security tools. For this setup, we’re only focusing on the CDN.
Bunny CDN is a paid service.
Pricing depends on which regions serve your content. It starts at $0.01/GB for Europe and North America, and goes up to $0.06/GB in the Middle East and Africa. You can control which regions are enabled to manage costs.
For reference, in June 2025 we transferred 143 GB across 4.4 million requests (3.9 million cached) with all regions enabled. The total cost? $2.30 USD. I’m happy with that.
Does Bunny CDN work with Cloudflare?
Yes, Bunny CDN works fine with Cloudflare.
If you’re already using Cloudflare for DNS management and security, you can still use Bunny CDN to serve static assets.
You’ll need to create a Pull Zone in Bunny and optionally configure a CNAME in Cloudflare. This isn’t mandatory but is useful for branding and integration.
My recommendation is to continue using Cloudflare for DNS, DDoS protection, and security features, while using Bunny for optimized content delivery.
How they all work together?
WP Rocket optimization settings
After activating WP Rocket, there are a few settings that you need to do.
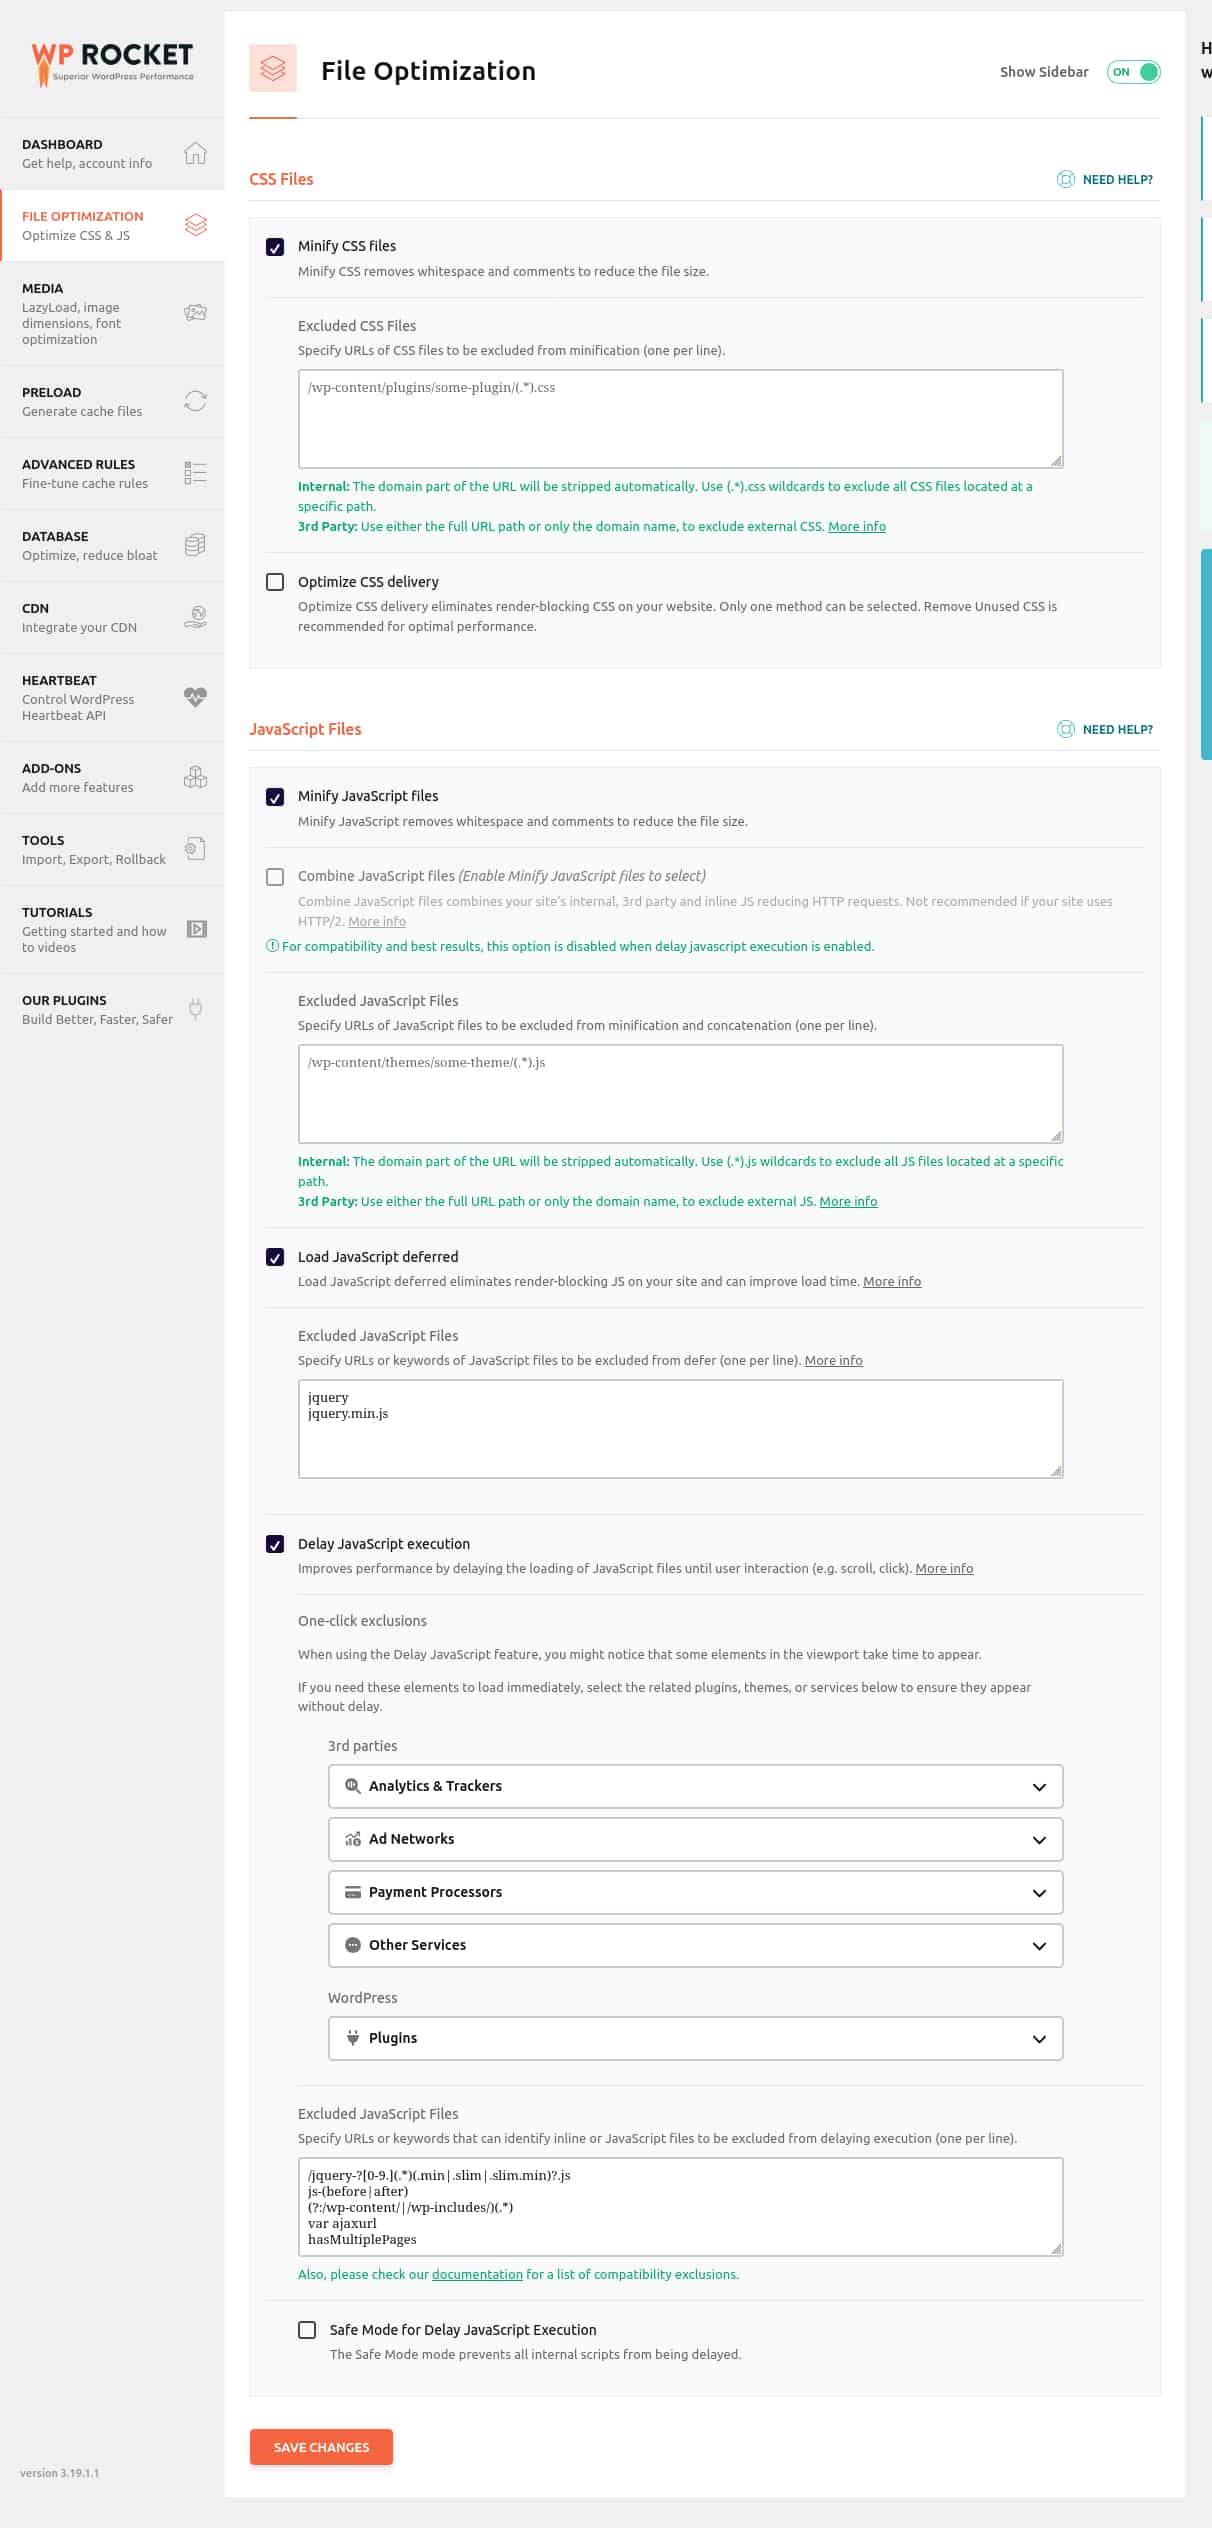
WP Rocket > File Optimization
- Minify CSS Files – YES
- Minify JavaScript Files – YES
- Load JavaScript deferred – YES
- Excluded JavaScript Files – add in here what you want to exclude. I recommend jquery and jquery.min.js
- Delay JavaScript execution – YES
- Delay JavaScript execution, Exclude JavaScript Files – add in here any scripts you want to exclude.
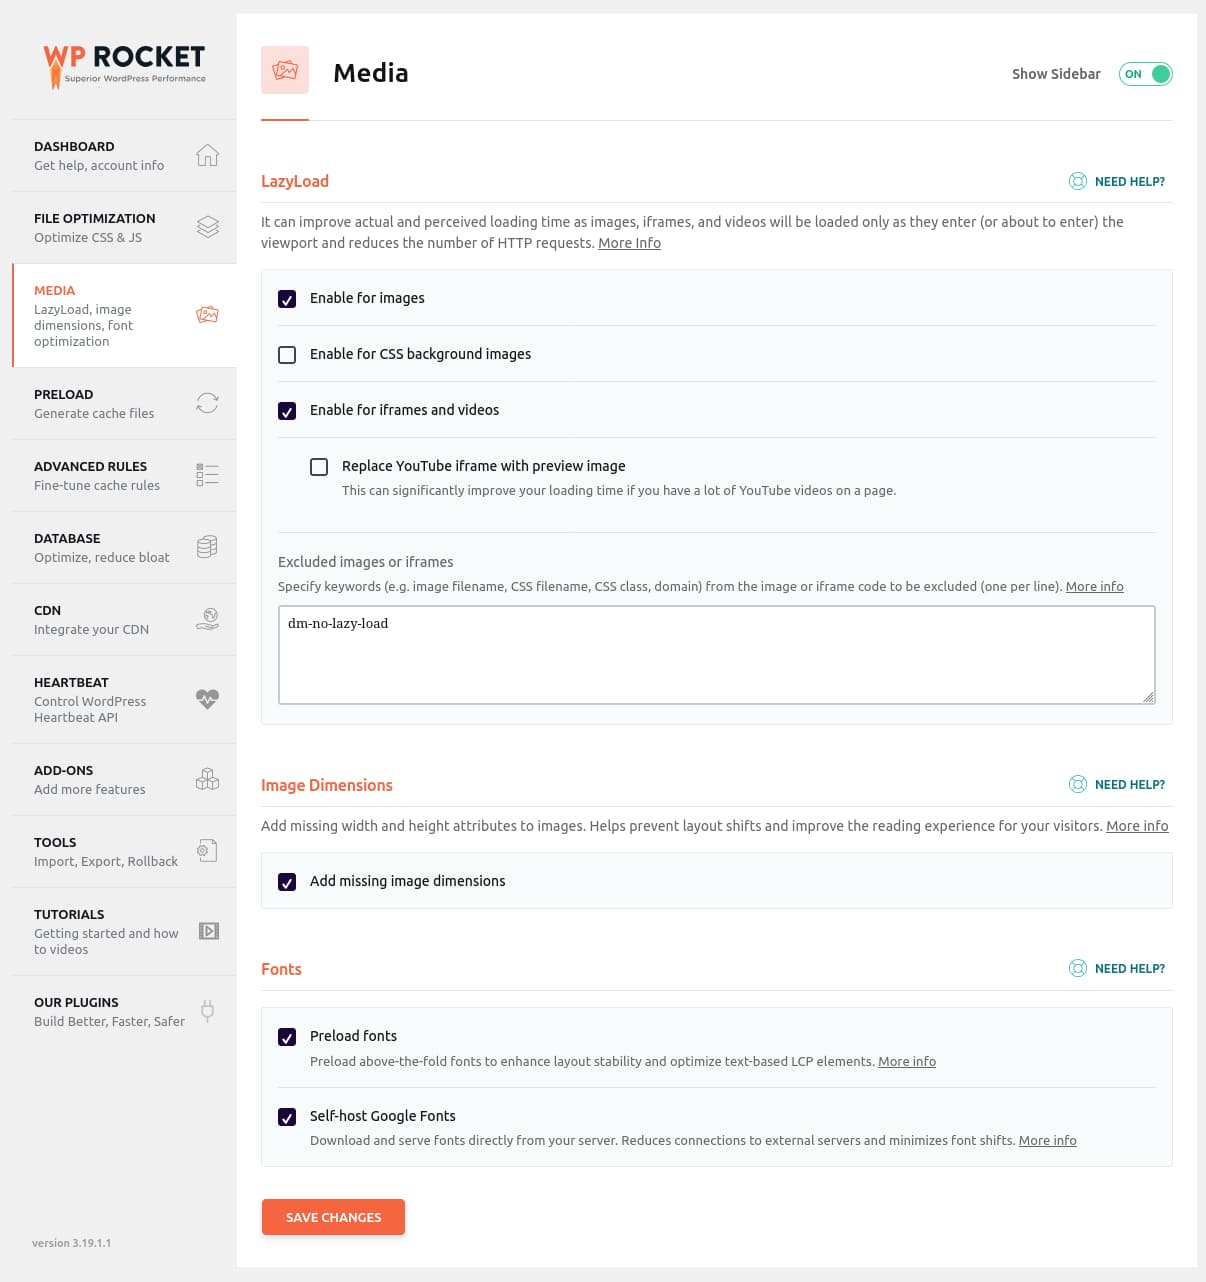
WP Rocket > Media
- LazyLoad Enable for images – YES
- LazyLoad Enable for iframes and videos – YES
- Image Dimensions Add missing image dimensions – YES
- Fonts Preload fonts – YES
- Fonts Self-host Google fonts – YES
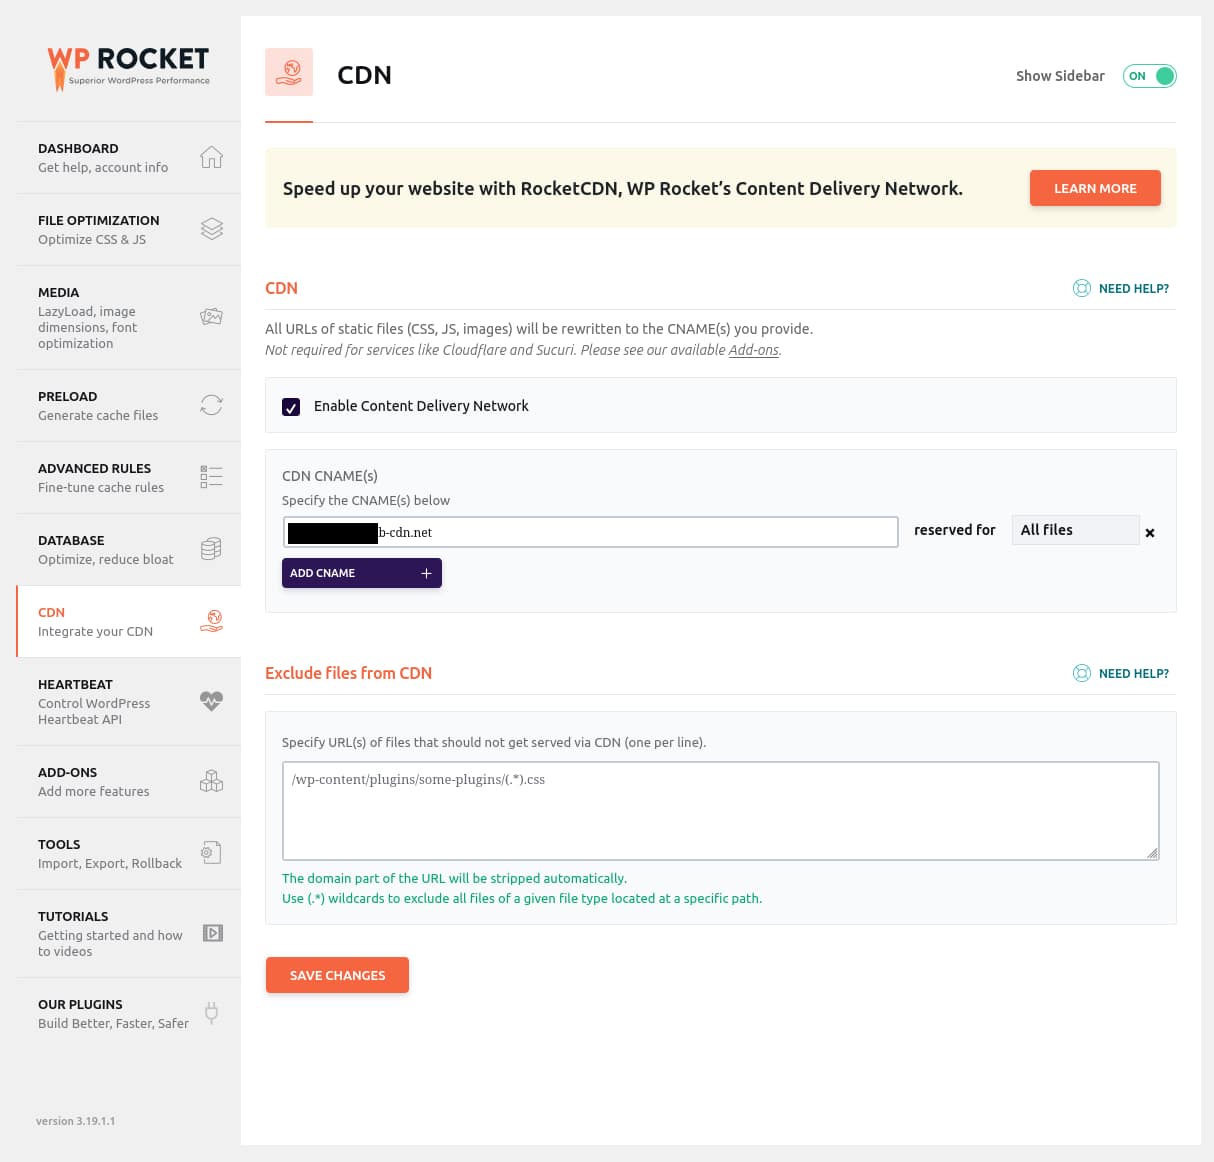
WP Rocket > CDN
- CDN Enable Content Delivery Network – YES
- Add the CDN CNAME from Bunny CDN
Imagify settings
Leave the defaults on. Only change them if you really need something different.
- Auto-Optimize images on upload – YES
- Backup original images – YES
- Lossless compression – NO (unless working with text-heavy or professional photo images)
- Next-gen image format – WEBP
- Resize larger images – YES
Bunny CDN settings
Again, simple setup.
Go and create a Pull Zone with the following settings:
- Name: keep it simple, match your domain;
- Origin URL: your site URL
- Tier: Standard
- Pricing Zones: Select what you need, I recommend all.
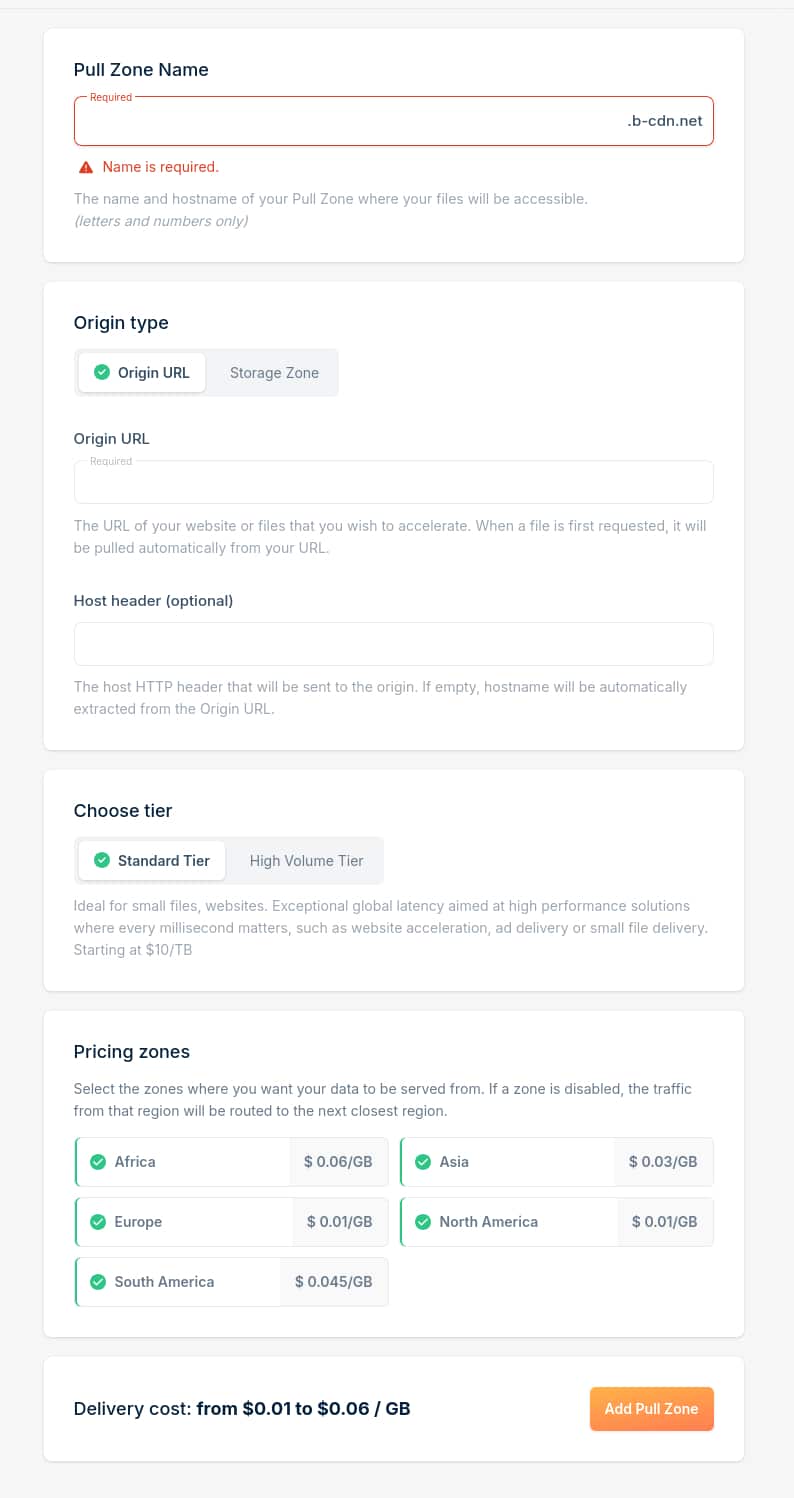
A Pull Zone will be generated and you go into WP Rocket > CDN and in the CDN CNAME add the zone.
Each Pull Zone has additional configuration options, but we’ll keep it basic here—Bunny does a great job handling sensible defaults.
Conclusion
Without realizing it, I’ve built a WordPress optimization stack entirely based in the EU: WP Rocket and Imagify from France, Bunny from Slovenia.
This setup offers everything we need:
- Easy of use
- Standardization across multiple clients
- Premium, reliable services
- Flexibility with advanced configuration options